Windowsフォームアプリでよく使うコントロール
- Windowsフォームアプリでよく使うコントロールをご紹介
- ラベル、ボタン、パネル、テキストボックスの概要をご説明
Windowsフォームアプリでよく使うコントロール
WindowsフォームアプリはFormクラスにコントロールを配置して作成します。
今回は、よく使うコントロールを紹介します。
他にも多くのコントロールが存在しますが、全部は紹介しきれないので、まずは主要なものを紹介します。
よく使うコントロールを使ったサンプルプログラム
実際によく使うコントロールを配置した画面を表示するサンプルプログラムを作って確認してみましょう。
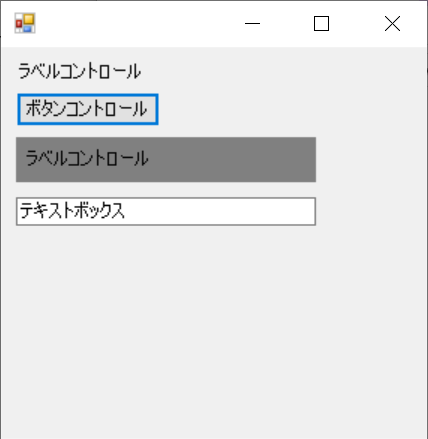
実行結果サンプル
プログラムを実行すると次の画面を表示します。
プログラム作成
ではプログラムを作成してみましょう。
次のファイルを同じフォルダに作成してください。
using System;
using System.Windows.Forms;

namespace SampleProgram
{
    class Program
    {
        [STAThread]
        static void Main(string[] args)
        {
            Application.EnableVisualStyles();
            Application.SetCompatibleTextRenderingDefault(false);
            Application.Run(new Form1());
        }
    }
}
using System;
using System.Windows.Forms;

namespace SampleProgram
{
    public class Form1 : Form
    {
        private Label label1;
        private Button button1;
        private Panel panel1;
        private Label label2;
        private TextBox textBox1;

        // コンストラクタ
        public Form1()
        {
            this.SuspendLayout();

            // ラベル
            this.label1 = new Label();
            this.label1.Location = new System.Drawing.Point(10, 10);
            this.label1.Text = "ラベルコントロール";
            this.label1.AutoSize = true;

            // ボタン作成
            this.button1 = new Button();
            this.button1.Text = "ボタンコントロール";
            this.button1.Location = new System.Drawing.Point(10, 30);
            this.button1.AutoSize = true;
            this.button1.Click += new System.EventHandler(this.button1_Click);

            // パネル
            this.panel1 = new Panel();
            this.panel1.Location = new System.Drawing.Point(10, 60);
            this.panel1.Height = 30;
            this.panel1.Width = 200;
            this.panel1.BackColor = System.Drawing.Color.Gray;

            // パネルに配置するラベル
            this.label2 = new Label();
            this.label2.Location = new System.Drawing.Point(5, 8);
            this.label2.Text = "ラベルコントロール";
            this.label2.AutoSize = true;

            // パネルにコントロールを貼付
            this.panel1.Controls.Add(this.label2);

            // テキストボックス
            this.textBox1 = new TextBox();
            this.textBox1.Location = new System.Drawing.Point(10, 100);
            this.textBox1.Text = "テキストボックス";
            this.textBox1.Width = 200;

            // コントロールを貼付
            this.Controls.Add(this.label1);
            this.Controls.Add(this.button1);
            this.Controls.Add(this.panel1);
            this.Controls.Add(this.textBox1);

            this.ResumeLayout(false);
            this.PerformLayout();
        }

        // ボタンクリック時の処理
        private void button1_Click(object sender, EventArgs e)
        {
            MessageBox.Show("ボタンをクリックしました");
        }

    }
}
C:\Windows\Microsoft.NET\Framework\v4.0.30319\csc.exe ^
  /t:winexe ^
  *.cs
pause
ファイルを作成できたらCompile.batを実行してみましょう。
同じフォルダにProgram.exeが作成されます。
Program.exeを実行して実行結果サンプルのように動いたら成功です。
プログラム解説
作成したプログラムを解説していきます。
ラベル
ラベルは文字を表示するコントロールです。
説明を表示したり、項目のタイトルを表示したりする際に使用します。
System.Windows.Forms.Labelを生成してFormに配置することで使用できます。
Textに表示する文字列をセットします。
            // ラベル
            this.label1 = new Label();
            this.label1.Location = new System.Drawing.Point(10, 10);
            this.label1.Text = "ラベルコントロール";
            this.label1.AutoSize = true;
ボタン
ボタンはユーザがクリックすることで処理を実行するコントロールです。
System.Windows.Forms.Buttonを生成してFormに配置することで使用できます。
Textに表示する文字列をセットします。
Clickにクリック時のイベントをセットします。
イベントについは、イベント処理のページを参照してください。
            // ボタン作成
            this.button1 = new Button();
            this.button1.Text = "ボタンコントロール";
            this.button1.Location = new System.Drawing.Point(10, 30);
            this.button1.AutoSize = true;
            this.button1.Click += new System.EventHandler(this.button1_Click);
パネル
パネルは他のコントロールをパネル上に配置することができます。
System.Windows.Forms.Panelを生成してFormに配置することで使用できます。
複数のコントロールをグループ化するために使用します。
また背景色を変えたり、境界線を出したりして、画面をエリア分けする際に使用します。
Formに配置するのと同じようにContorolsにAddすることで、パネル上にコントロールを配置できます。
            // パネル
            this.panel1 = new Panel();
            this.panel1.Location = new System.Drawing.Point(10, 60);
            this.panel1.Height = 30;
            this.panel1.Width = 200;
            this.panel1.BackColor = System.Drawing.Color.Gray;
            ・・・略・・・
            // パネルにコントロールを貼付
            this.panel1.Controls.Add(this.label2);
テキストボックス
テキストボックスはユーザが文字を入力するために使用します。
System.Windows.Forms.TextBoxを生成してFormに配置することで使用できます。
Textを参照することで入力された文字列を取得できます。
            // テキストボックス
            this.textBox1 = new TextBox();
            this.textBox1.Location = new System.Drawing.Point(10, 100);
            this.textBox1.Text = "テキストボックス";
            this.textBox1.Width = 200;